Simon Gee of Canuk Images has taken many incredible northern lights images during his time in Churchill. In this guest blog, Simon offers tip and tricks for capturing the aurora borealis on camera.
The first time I started looking for the aurora borealis (a.k.a. the northern lights) was in Churchill 2005 and I was on my back deck on Button Street. The sky and the stars were unbelievably clear and sharp but to be honest I had no idea what to be looking for as I hail from London, England and had only recently heard of these mysterious night sky lights. This soon became quite obvious once the night sky started swirling in a color frenzy.
It is at this point if you have a camera (and you have come back outside after shouting to everyone inside to come out and see this thing happening in the sky), you are probably wondering, ”how do I capture this to show my friends and family at home?”. When I began photographing the aurora all I had was a basic Canon digital camera I bought for $150 but I managed to capture the image you see below and hopefully after reading this you too will be able to take something home for friends and family (even yourself!) to wow over.
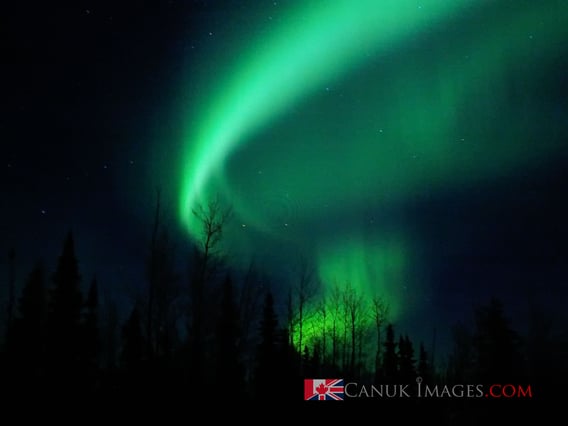
Northern Lights captured with a basic Canon digital camera
Here's a rundown of the equipment I recommend for northern light photography.
Camera - any camera that can allow exposures for a minimum of 15 seconds (most will allow this) and with some degree of customization. A compact, a Digital SLR or even a film camera will work. It will be more challenging to shoot with a compact and will not have the image quality of a DSLR, but it is still possible.
Lens - For cameras that allow you to change the lens i.e. a Digital SLR, it is ideal to use a ‘fast’ lens of F2.8 or less (fast = larger aperture that lets in more light). It is possible to shoot with ‘slower’ lens of around F4 - 5.6 but will increase shooting time and/or ISO and camera noise. Many cameras today allow for quite high ISO with minimal camera noise. I use a Tokina 11-16mm F2.8 on my Canon 7D and on my Canon 5D MK2 a Sigma 15mm Fish Eye or the Canon 17-40 ‘L’ F4. The pro’s may use a Canon 16-24mm F2.8 (or Nikon equivalent) or even the Canon 24mm F1.4 but they have quite the price tag attached to them. Wide angle lens help to capture sky-wide aurora but distorts the image at the edges. Check camera/lens compatibility with your local camera dealer before purchasing anything online.
Tripod - doesn’t have to be a carbon fibre top of the range, but any that will allow you to attach your camera on to a stable platform. Winds may move the camera on long exposures but some tripods allow a bag to be hung from the tripod itself so as to stabilize and reduce vibration/movement. Also do not move if you are standing next to your tripod on snow during the exposure - this is through experience - if you shuffle your feet to keep warm near your tripod, the vibrations through the snow may jog your tripod legs resulting in blurred images - stay still whilst exposing!
Cable or infrared remote - Get one to prevent camera shake but your internal 10 second camera timer will work just as well for most circumstance.
Extra batteries - The cold will drain batteries quicker than normal so keep spares in a warm pocket near to your body as the heat will maintain their charge for longer.
Flashlight/Torch/Headlamp - Important for seeing camera functions, focusing on near subjects (be aware of others exposing around you as they won’t be happy if you shine it at their camera!) Can also be used to light up subjects.
External camera flash - for the more experienced, lighting a subject area or persons may enhance your image and is be a fun way to include yourselves in your images. See ‘Flash’ section for more tips.
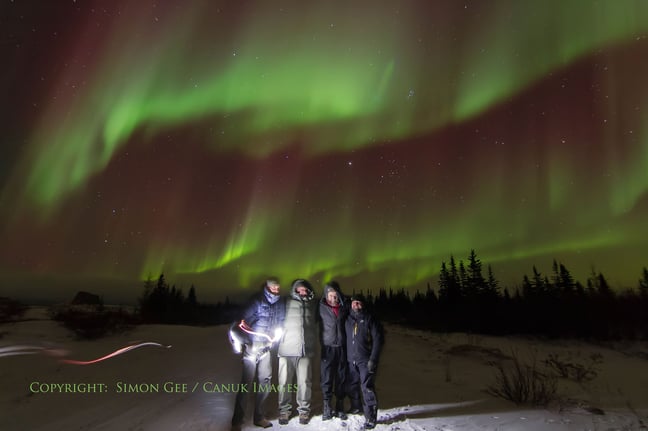
Using a flashlight to light up subjects in the photo is a fun way to include yourself.
Camera set-up
Now due to the many camera manufacturers there will be various ways in which the menu system works but as I have worked with Canon (and a few Nikon cameras) I can only refer to setting a camera up as a whole, leaving yourselves to do a little bit of investigation on your own camera. This is by no means the only way to photograph the northern lights, but information I have learnt over the years producing very pleasing results as a whole.
In-camera menu - there are long exposure noise reduction and also high ISO noise reduction features on most DSLR cameras. If you are shooting in what is know as RAW (basically a high resolution version of a JPEG) then I recommend turning off both features and reduce noise through software post-shoot. The reason for this is that the camera will in fact take 2 shots to balance the noise the camera sensor produces and creates one final image with reduced noise. Two shots means double the time and if shooting a time lapse or just simply wanting to shoot as many images as possible because the lights are so amazing this can be problematic/stressful. Generally, I turn these features off and deal with it at home with software such as Google's NIK D-FINE. If shooting JPEG then you may leave the features on as the camera will process the information from a JPG much more quickly compared to a RAW (depending on CF/Sd memory card speed and camera).
I would highly recommend shooting in RAW to obtain the most information possible as the images don’t look like the images viewed on the screen at the back of your camera (usually looks so much better on the camera view screen than on your laptop) then you possibly have more image information to save potentially lost/underexposed images. Ideally it is always best to try to get your exposures roughly correct at the time. Chat with your friends/guide to discuss each others settings/exposures/histograms etc, which may help remind you of something you forgot to do as the cold temps slows down a tired, late at night brain.
Mirror lock up - Try to find this in your menu system to reduce the amount of vibration reducing your image quality. Most cameras will have this feature.
Self timer - This can be used if you do not have a remote timer. I recommend using the 10 second delay to allow most camera shake to dissipate. Ultimately a remote is the best way to go. If you choose or have the battery infrared version make sure you have spare batteries.
Focus - Either manually focus one third into field of view, on the chosen subject lit by your headlamp, or focus on the stars using the ‘live view’ screen at the back of your camera.
Using the ‘Live View’ screen - Make sure you are zoomed right out on the lens (i.e. @ 11mm). Find the brightest star in the sky using your eyes then move your tripod mounted camera to it so the star is in the centre of your LCD live view screen. Then using the zoom buttons for your screen, zoom in on the chosen star and manually focus to it. Now do not touch the lens nor focus (some even tape the lens to prevent accidental adjustment) and switch off the ‘live view’ mode. In fact, make sure in your camera settings the camera doesn’t review every image after it is taken as this is a battery eater i.e. when you take a photo and your camera shows you what you have just taken - switch this off. Focusing on the stars will make the stars sharp but not your close subject. Focus on the subject and the stars will not be sharp. Use whichever method is best for your needs as they both produce fantastic results.
Another technical way of increasing depth of focus is called ‘hyperfocal distance’. This is a great way of obtaining focus especially in difficult lighting conditions and can be calculated using a phone APP or from websites where you can calculate your hyperfocal distance to focus at. Basically once you input your camera into the online chart (i.e. Canon), your lens (i.e. Tokina 11-16mm@11mm), F-stop (i.e. F2.8) and subject distance (you and your friends standing about 10 feet away) and it will calculate a point at 7.42 feet to focus at (some lens have distance markings on them) giving you sharp focus from 3.71 feet away to infinity.
If you choose to focus through the eyepiece always remember to adjust this to your own eyes with the small side wheel (diopter) adjuster by right of the eye piece.
Level the camera to your horizon - Some new cameras have a built in horizon, some tripods have a built in bubble level and you can buy levels that attach to your camera's hot-shoe. Whatever you use, level your camera to prevent crooked horizons in your final images. If you level the horizon post-processing there is a chance image quality may degrade.

Using a fish-eye lens to capture the lights.
Program, Manual or Aperture priority?
This will depend on how comfortable your are with your camera, but get a little more daring by switching the camera from the ‘P for program’ or even the ‘green’ mode (optimum everything decided by camera) to either Av/A (aperture priority) or M (full manual - balancing shutter/aperture and ISO) - these results can be most rewarding.
Setting the camera to Av (F2.8 = big aperture/hole letting in more light to the sensor) will let the camera decide how long the shutter will be open for after you have chosen the aperture i.e F2.8. This can be balanced by adjusting your ISO (film speed) until you get roughly the correct exposure reading on your light meter. Remember to check the histogram after shooting to adjust exposure if necessary. Use exposure compensation +/- to add a stop or stop and a half if required.
On fully manual it is all up to you. Depending on the fullness of the moon, I usually start shooting at 11mm, F2.8 @ 20 seconds, ISO 2000, then check my histogram adjusting my ISO, exp. comp. or exposure time accordingly. To prevent star trails appearing in my final image I use the ‘500 Rule’.
The ‘500 Rule’ - If i used my Sigma 15mm lens on my Canon 7D (aka an APS-C ‘crop’ sensor, which multiplies the lens focal length on a Canon by x1.6 whereas a Nikon ‘crop’ sensor will be x1.5) then I would use the calculation of 500 divided by 15 = 33.33 then divide this by the sensor crop of 1.6 = 20.83 then round down to the nearest number on your camera = 20 seconds = the longest exposure before star trails appear with this lens.
On my Canon 5D mk2 aka a ‘full’ frame camera with my Sigma 15mm this would be 500/15 = 33.33 or 30 sec exposure as there is no crop factor to multiply.
Cheat charts can be found online so you don’t have to remember the calculations. If you go beyond 30 seconds in your calculations then you will have to switch to Bulb (B) mode and hold the remote shutter for the length of time calculated or increase your ISO.
ISO or film speed/sensor sensitivity - you will be amazed at how much more light/aurora colors your camera sensor can gather than your eye - around ISO 1200. With new Pro-DLSR cameras being able to shoot with an ISO of over 100,000 they almost have the ability to shoot in near darkness and still capture an image. Now most of us do not have that camera capability but if your camera allows you to, start at around ISO 1600-2000 or even 3200 as most modern cameras will be able to create quite a useable image with great colors, but some image noise, which can be easily handled with post processing software. Now it will depend on ambient light such as the brightness of the moon whether this is too much or not. Let your cameras light meter, histogram and your creativity guide you.
Histogram - It takes a lot of experimentation to get this right and on first sight this graph is quite daunting. Basically when you take an exposure the camera reads the tonal value of your image. Black being represented on the left hand side of the graph and whites to the right. To start with, try keeping the information peaks within the goal posts/outer limits on the graph. If the lines are squashed to the left this means underexposed giving a very dark image and all to the right is way too light. Adjust exposures accordingly to bring the graph more to the centre-left without blowing out lights (maybe switch on your in-camera highlight alert to see overexposure when reviewing images).
Flash - A useful tool for getting you and your friends lit up in the frame. Get someone to stand in frame and light up their face with a flashlight. You then focus on them (or use your new hyperfocal distance skills) and set up your camera to shoot with a second curtain flash. Whats this going to do? Well after you get into position, press the remote, wait ten seconds, the camera starts to expose, everyone stands really still and then right at the last moment before the shutter closes a flash burst occurs (adjustable power in camera menu) lighting up the subject and the camera is left to compute the image and what will you see? Well probably you and your friends in focus and the northern lights blazing over your heads. Totally amazing and so worthwhile. For some they may wish for their non human subject (Inukshuk?) to be lit and this can work for it too. Practice makes perfect! Some DSLR trigger a flash unit off-camera via infrared or wifi to achieve some really fancy subject up / backlighting. Alternative to the flash is your flashlight but can have less predictable results.
White Balance - Leave on auto and sort it in post processing. Sodium street lights and other ambient lights can be adjusted later.
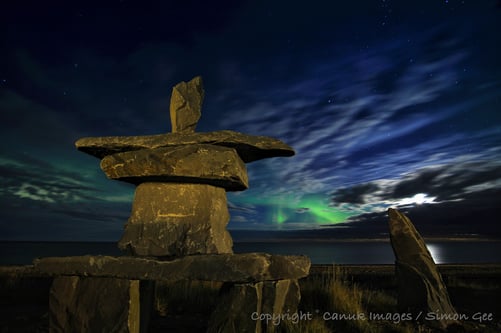
Churchill's Inukshuk and the Northern Lights.
EXTRA HELPFUL TIPS
Remove the protective front filters to prevent rings appearing in your photos. The aurora is an intense light that will reflect between your filter and the front lens glass creating concentric rings in your images. This is due to the high reflectivity of the aurora.
REMEMBER: No filters means ‘take extra care of that unprotected lens glass!’
Let your equipment cool down to outside temperatures - the difference in temperature between your vehicle/home and outside is likely to be extreme so allow your equipments’ aluminium, carbon fibre, metal and glass to settle down in these lower temps for 10+ minutes.
This also goes with bringing the camera back inside when you're done. Cover your camera in a plastic bag / replace in camera bag outside before coming inside to prevent condensation forming in the camera or lens.
Subject matter really helps - a tree, building, Inukshuk, snowy bank with trees or even yourselves. Try to find an interesting feature that would complement the lights above. As much as the lights are beautiful when you look at your final images having a familiar feature in the foreground really helps bring more to the final image.
MOST IMPORTANTLY - Practice with your camera before going outside so you are not scrambling to get to know where all the camera buttons are as the lights are dancing wildly in the skies above. Practice shooting the night sky at home. This may reduce any potential on site panic/chasing your guide or fellow photographer for advice and you may be amazed at your results!
AND FINALLY -
REMEMBER - AT SOME POINT PUT YOUR CAMERA DOWN, MAYBE LIE DOWN IN THE SNOW, AND ENJOY MOTHER NATURE AT HER MOST COLOURFUL.
WHISTLING IS OPTIONAL.
To see more of Simon's great images visit the CanUK website and Facebook.